Sunday 21 July 2013

A Spanish Supper!

I cooked dinner on Thursday evening for my mum, grandma and Linda (mother to one of my best friends, she's a family member without the DNA ties!). My mum had been telling both of them about Printed On A Chutney Jar and my cooking progress so they were both keen for a demonstration. Having gone to bed at my Aunty Caroline's house the previous night reading Rick Stein's 'Spain', it seemed appropriate to give a couple of recipes from this fantastic cook book a go, neither of which I'd cooked before. 

Dinner was supposed to be served at 8pm but ended up being served shortly after 9pm, who knew that all that fine chopping would take such a long time! Lots of prep work for these dishes but the recipes themselves weren't difficult and the end result looked a lot more impressive than it actually was!

So here they are: Andalucian Shrimp and Spring Onion Fritters and Baked Scallops with Guindilla Pepper, Chorizo and Crisp Breadcrumbs. I served the two starter dished together with a simple green salad with a scattering of fresh from the freezer frozen peas. Delish!


Andalucian Shrimp and Spring Onion Fritters (makes 16 fritters)

Rick Stein's recipe uses raw peeled prawns and he talks you through the process of dealing with them. I however used frozen cooked prawns, just allowing time for them to thoroughly defrost before preparing this dish. I also used twice the amount of spring onions (he said 2, I used 4 for some unknown reason - I didn't realise until afterwards!)

Ingredients

300g small cooked prawns
175g plain flour
½ tsp baking powder
1 tbsp dry white wine
4 spring onions, thinly sliced
1 tbsp chopped flat-leaf parsley
Olive oil, for shallow frying
Salt

Method

Sift the flour, baking powder and a pinch of salt into a mixing bowl. Make a well in the centre and add 300ml water and the wine. Gradually mix the dry ingredients into the liquid to make a batter, then whisk until you have a thick cream. If the prawns have been defrosted, make sure the excess water has been removed with kitchen paper. Fold the prawns, spring onions and parsley into the batter.

The batter mixture

Pour 5cm of oil into a large frying pan and place over a high heat. Leave until hot but not smoking, and until a drop of the batter into the pan and spread each one out a little with the back of the spoon so they develop lovely think, crispy edges as they cook. Don't be tempted to overcrowd the pan - I managed to cook 3 at a time.


Cook, turning the fritters over every now and then, for about 2 minutes or until puffed up and golden brown on both sides. Remove with a slotted spoon and drain on a tray lined with plenty of kitchen paper. Eat straight away while they are still hot and crisp.


Baked Scallops with Guindilla Pepper, Chorizo and Crisp Breadcrumbs
(serves 4 as a starter)

Ingredients

5 dried guindilla peppers or ½ tsp crushed dried chilli flakes (I went with the flakes as I happened to have some in the cupboard)
4 tbsp olive oil
75g finely chopped shallots
4 large garlic cloves, finely chopped
65g cooking chorizo sausage, skinned and finely chopped (I didn't bother skinning mine!)
1 roasted red pepper, finely chopped (this was job number one and it roasted whilst I chopped everything else!)
2 vine-ripened tomatoes, skinned, seeded and chopped (again, no skinning, no de-seeding!)
8 prepared large scallops (ideally served in the shell with the coral attached, mine unfortunately were not - sad face) Mine were actually smaller scallops so it was 4 per person
80g breadcrumbs, made from crustless day old white bread
Sea salt

Lots of fine chopping!!
Method

If you're using the proper dried guindilla peppers, remove the stalks, slit them open and remove all the seeds. Soak in hot water for 1 hour. Drain the peppers and scrape the flesh away from the skins with a spoon. Discard the skins.

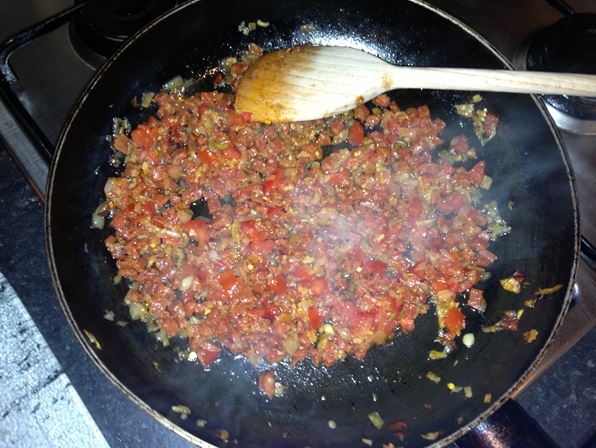
Preheat the oven to 200°C/Gas Mark 6. Heat 3 tablespoons of olive oil in a frying pan over a medium heat. Add the shallots, garlic and chorizo and cook gently, stirring occasionally for 5 minutes or until the shallots are soft and sweet. Add the guindilla pepper flesh (or in my case the chilli flakes), roasted red pepper and tomatoes, season to taste with a little salt and simmer for another 3 minutes.


Detach the scallops from their shells and cut them horizontally in half, leaving the coral attached to one slice. Spoon some of the sauce into the bottom of the shells (or into beautiful terracotta dishes like me!). Season the scallop pieces lightly and place a row of scallops across the dish on top of the sauce. 

The dish in stages before it went into the oven


Mix the breadcrumbs with the remaining olive oil and a pinch of salt and sprinkle over the scallops and partly over the sauce. Place them side by side on a baking tray and bake on the top shelf of the oven for 8-9 minutes or until the scallops are just cooked through and the breadcrumbs are crisp and golden.


A very scrummy Spanish supper!

Dinner is served!

Please note all photographs used in this blog entry are actual pictures of my cooking, not file photos.

Friday 19 July 2013

Pasta al Pomodoro

Mum and I were having a quiet night in tonight and decided to make something simple with whatever we had in the cupboards. She had kindly sent me a recipe for making my own gnocchi (a cooking dream I am yet to fulfil or even attempt actually!) earlier in the day and it reminded me of a beautiful pasta al pomodoro I had eaten in India last year so I decided to give it a go! I've eaten enough pomodoro to have an idea what should be in it but the beauty of this Italian sauce is that as long as you have the basic ingredients: tomatoes, olive oil, basil, onion and some fantastic cheese, you can play around with it and add in all sorts of different ingredients. I must confess that writing out the ingredient list may be a little difficult as there wasn't much measuring involved and there was a lot of tasting and seasoning and tasting and seasoning going on. This recipe is for a main course for two people but could obviously be a starter for four!


Ingredients (this recipe serves 2 people as a main course)

3 glugs of olive oil
7 shallots, finely diced
4 plump cloves of garlic, crushed
1 can of peeled plum tomatoes, throughly squashed with a fork
6 fresh vine plum tomatoes, finely chopped
4 sundried tomatoes, finely chopped
Half a ball of mozzarella, roughly chopped
A good handful of fresh basil, roughly chopped
A decent grating of Parmesan cheese
Sea salt and pepper
175g pappardelle pasta


Method

Heat a few lugs of olive oil in a pan over a medium-low heat. Add the finely chopped shallots and mix thoroughly with the oil then cook, stirring until soft, which should take about seven or eight minutes. Add the garlic to the shallots and cook for 2 to 4 minutes. 

Turn the heat up to medium, add the squashed peeled plum tomatoes and freshly chopped vine plum tomatoes and season lightly with sea salt. At this point I also filled the now empty can of peeled tomatoes a third full with water, gave it a rough shake to release the tomato sauce that remained in the can and added this to the sauce mixture in the pan. Add the chopped sun dried tomatoes and cook, stirring occasionally, until the sauce thickens slightly and the flavours infuse together. This should take between 15 and 20 minutes. 

While the sauce is cooking, bring a pan of water to the boil. Season with salt, add the pappardelle and cook, stirring occasionally, until cooked. Everyone has a preference for how they cook their pasta but at our house it's always al dente.

Once the sauce has thickened and thoroughly cooked through, remove from the heat, stir in the roughly chopped basil, a few twists of freshly ground black pepper and the chopped mozzarella. Stir thoroughly until the mozzarella has melted into the sauce. At this point I also added in a small handful of grated parmesan and stirred this in as well.

Drain the pasta and add to the sauce, stirring to coat the pasta with the sauce. I served the pasta in bowls with a fresh grating of parmesan and some fresh basil leaves on top. My mum decided to have hers on a bed of salad, I just went with the pasta!

Seriously yummy comfort food!


Please note all photographs used in this blog entry are actual pictures of my cooking, not file photos.

Wednesday 10 July 2013

'Slut-Red' Raspberry Chardonnay Jellies

My dad turned 64 on 4th July and I cooked him a birthday meal to celebrate. After much deliberation I decided on a menu made up of dishes that I'd never cooked before: Pork belly with a star anise plum sauce, garlic potato croquettes and Parmesan crusted creamed spinach followed by Nigella Lawson's 'Slut-Red' Raspberry Chardonnay Jellies. I was a little intimidated by the huge list of ingredients and cooking processes for all the dishes but I took it one step at a time and everything somehow came together as planned.

After an afternoon in the kitchen, I was proud to present the birthday meal I'd slaved over and everyone loved it - it just goes to show that in the kitchen it's worth taking a risk sometimes. 

This blog entry will cover the dessert course portion of the meal which served 4. The recipe serves 6 (which meant extra desserts for the day after!).


Ingredients

1 x 750ml bottle good fruity chardonnay
300g raspberries
1 vanilla pod (split lengthwise)
16g gelatine leaves
250g caster sugar
double cream (to serve)


Method

Place the wine and berries in a bowl and allow to steep for half an hour. Strain the wine into a saucepan and keep the raspberries to one side. Heat the wine with the vanilla pod until nearly boiling and leave to steep on one side for 15 minutes.

Soak the gelatine leaves - which you can find in the supermarket these days - in cold water for about 5 minutes. Meanwhile, after removing the vanilla pod, reheat the wine and stir in the sugar until it dissolves; allow to boil if you want to lose the alcohol.


Add a third of the hot wine to the wrung-out gelatine in a measuring jug and stir to dissolve, then add this mixture back into the rest of the wine and stir well. Strain into a large jug.

Nigella's recipe recommends placing the raspberries, equally, into six flattish, clear glass serving bowls, and pour the strained wine over the top. I didn't have enough suitable bowls so decided to use martini glasses for a few of my desserts.

Allow to set in the fridge for at least 3 hours, though a day would be fine if you want to make this well ahead, and take out of the fridge 15 minutes before serving.

Serve some double cream in a jug and let people pour this into the fragrant, tender, fruit jewelled jelly as they eat.

The finished desserts and my dad enjoying his!

Please note all photographs used in this blog entry are actual pictures of my cooking, not file photos.

Pork Belly with a Star Anise & Plum Sauce, Garlic Potato Croquettes &Parmesan Creamed Spinach

My dad turned 64 on 4th July and I cooked him a birthday meal to celebrate. After much deliberation I decided on a menu made up of dishes that I'd never cooked before: Pork belly with a star anise plum sauce, garlic potato croquettes and Parmesan crusted creamed spinach followed by 'Slut-red' Raspberry Chardonnay Jellies. I was a little intimidated by the huge list of ingredients and cooking processes for all the dishes but I took it one step at a time and everything somehow came together as planned.

After an afternoon in the kitchen, I was proud to present the birthday meal I'd slaved over and everyone loved it - it just goes to show that in the kitchen it's worth taking a risk sometimes. 

This blog entry will cover the main course portion of the meal which served 4.


We'll start with the Pork Belly with Star Anise and Plum Sauce:

Ingredients

1kg of pork belly (I used a slab but you can use thick strips of belly too)
1 tbsp fennel seeds
1 tbsp coriander seeds
1 star anise
2 tbsp light soy sauce

For the sauce:

3 ripe plums (stoned and quartered)
1 small cinnamon stick
1 star anise
1 tsp grated root ginger
2 tbsp red wine vinegar
4 tbsp soft brown sugar


Marinading the pork belly, the spice mixture and the herb crust just before it went in the oven
Method

Preheat the oven to 240°C/Fan assisted 220°C/Gas Mark 9, score in a cross cut pattern on the skin of the belly, this is crucial if you want to end up with the most amazing crackling.

Rub the soy sauce into the skin and the meat. My grandmother always recommends putting a little water on the skin side of the pork belly (I did this before rubbing in the soy sauce) and this apparently makes for an even better crackling!

In a pestle and mortar, lightly crush the fennel seeds, coriander seeds and star anise. Rub the crushed herbs into the skin of the pork, reserve 1 tsp to be used in the sauce.

Place the pork on a rack inside a roasting tray, roast in the oven for 25 minutes. Turn the heat down to 160°C Fan 140°C/Gas mark 3, pour 1 cup of water into the roasting tray while the meat remains on the rack, roast for a further 1 hour. Top up with water throughout.


The sauce ingredients, cooking the sauce and the pork's ready to come out of the oven!


While the pork is cooking, prepare the sauce. In a small saucepan, heat some oil and slowly fry the grated ginger until it changes to a very light golden colour (around 1-2 minutes). Add the cinnamon stick, star anise, plums, red wine vinegar, 1 tsp of herb mix set aside earlier and brown sugar. Give it a good mix in the pan, cover and lower the heat. Cook for around 20 minutes or until the sauce is slightly sticky and syrupy. Mash the plums with the back of a spoon if it is not completely broken up during cooking, this will release more juice and increase the volume for generous portions when served.


And it's done!

Next, the garlic potato croquettes:

Ingredients

1.2kg floury potatoes (such as Maris Piper), cut into 5cm chunks
150g unsalted butter
2 medium free-range egg yolks
150g wild garlic leaves, finely chopped (I didn't have leaves so I just crushed a whole bulb of garlic!)
3 medium free-range eggs, whisked with 1 tbsp milk and a pinch of salt to make an egg wash
Breadcrumbs to coat
Vegetable oil to fry

Method

Rinse the potato cubes in cold water, then put in a pan of salted cold water and bring to the boil. Simmer for 15 minutes until tender. Drain and leave to dry for 5 minutes.

Put the potatoes in a pan on a medium heat. Add the butter, mash until smooth, then add the egg yolks and wild garlic (or crushed garlic cloves). Season well, cool, then chill for 1 hour.

Making the mash

After the mash has chilled, shape with your hands into barrel-shaped croquettes. Dip into the egg, roll in the breadcrumbs, then chill until ready to cook. If you're wanting to prep and cook these croquettes in one go, let them chill for at least half an hour to allow them to hold together better when frying. The longer you can chill them, the better.

Making the croquettes
Heat a good amount of oil (5-6cm deep) in a pan to 180°C (a cube of bread dropped in should brown in 30 seconds) and deep-fry the croquettes for 2-3 minutes until golden. If not serving right away, leave to cool, then reheat in a hot oven for 10 minutes. I should note at this point that the croquettes could probably be frozen after cooling and defrosted and reheated at a later date.


And finally Nigel Slater's Parmesan creamed spinach:

Ingredients

1kg spinach (fresh is essential - remove tough stalks and ropey leaves)
300ml milk
A small onion
A bay leaf
A couple of cloves
50g butter
50g plain flour
50ml double cream
Salt and pepper
Nutmeg

The ingredients for the sauce

Make a white sauce by warming 300ml of milk in a pan with a bay leaf, a small onion and a couple of cloves. Just before it boils, remove from the heat and leave to infuse. Melt 50g of butter in a saucepan, stir in 50g flour and mix to a thin paste. 

Remove the onion, bay leaf and cloves from the now infused milk and whisk it into the butter/flour mixture. Keep stirring over a low heat until the sauce thickens. Stir in 50ml of double cream and season with salt, black pepper and nutmeg. 

Making the white sauce

Wash 1kg of spinach then steam until tender. This should only take a few minutes. Wring out any water, roughly chop, then stir into the cream sauce. Keep stirring until the sauce takes on a green colour, check the seasoning and serve.

Pour the creamed spinach into a shallow dish and scatter the top with a layer of grated Parmesan before baking in a moderate oven to make a spinach gratin. Cook until golden - this should take 7 to 8 minutes.


It really was a delicious meal and one that I'll be cooking again I'm sure!


Please note all photographs used in this blog entry are actual pictures of my cooking, not file photos.
A Beautiful, Simple, Risotto Bianco


I found this recipe in the 'James does....' cook book in the Italy section and decided to cook it with my mum one night back in June. Having never made a risotto before I was a little apprehensive but decided to give it a go and I have to say, having followed the recipe to the letter it worked out perfectly! A beautifully simple risotto with bags of flavour that can be served as a starter or a main course - yum!


Ingredients (Serves 4)

1 litre vegetable stock
Olive oil
½ an onion, peeled and finely chopped
1 stick of celery, trimmed and finely chopped
300g risotto rice
Sea salt and freshly ground pepper
125ml white wine
A knob of butter
A large handful of freshly grated Parmesan cheese


Method
·      
Pour your stock into a pan and leave on a low heat. Get an appropriately high-sided pot on a low heat and add a good lug of olive oil, the chopped onion and the celery. Cook gently for 10 minutes, stirring occasionally, until soft but not coloured. Turn the heat up to medium, add the rice and a pinch of salt and stir for 2 minutes, so that the rice sucks up all the lovely flavour and develops a nutty taste. 


Pour in the wine and stir until absorbed. Add a ladle full of stock, stir, and wait until it’s been fully absorbed before adding more. Cook for 16 to 17 minutes, adding more stock every minute or so and stirring regularly, until the rice is al dente. This means it should be soft and a pleasure to eat, but still holding its shape. At this stage the risotto should be slightly looser than you want it to be finally, as it will thicken as it sits. 


Take the pan off the heat, stir or beat in the butter and Parmesan, then season to taste. At this point you've got an absolutely delicious risotto bianco, which is simple, lovely, comfort food. You can either tuck in or take it a few steps further by adding different cheeses or vegetables. Once you've taken it as far as you want, pop the lid on and let it sit for 2 minutes before serving. The most important thing to keep in mind is that risotto must always be oozy.


Please note all photographs used in this blog entry are actual pictures of my cooking, not file photos.